The local agent is the small program that talks to your printers over your own network and tells BolloPrint what it sees. If there's a machine in the workshop that already runs Docker, that machine is all the agent needs.
- Any computer with Docker: a NAS, a mini-PC, the workshop PC, a Raspberry Pi or a server you already have. Portainer works too.
- One file, already filled in: BolloPrint gives you the manifest with your agent's keys inside. Nothing to edit.
- No router changes: no open ports, no fixed IP, no firewall rules.
- It updates itself: when a new version comes out, it installs it on its own.
💡 Is your machine a Synology, QNAP, TrueNAS, Windows PC or Home Assistant?
Then look at its own package first: it installs like any other app and links with one click, no manifest involved. You'll find all the options in the local agent. Docker is for everything else.
What you need
- A computer in the workshop that stays on.
- Docker with Docker Compose, or Portainer.
- Ideally, the computer is on the same network as the printers, so the agent finds them by itself.
The agent is lightweight: it doesn't need a powerful computer, the manifest caps it at 512 MB of memory, and the image runs on Intel/AMD and ARM alike.
💡 Docker Desktop on Windows or Mac
There, Docker runs inside a virtual machine that can't see your network, so printers aren't discovered on their own. The agent works just the same; you add each printer by its IP address instead. On Windows, the Windows installer doesn't have this limitation.
1. Create the agent in BolloPrint
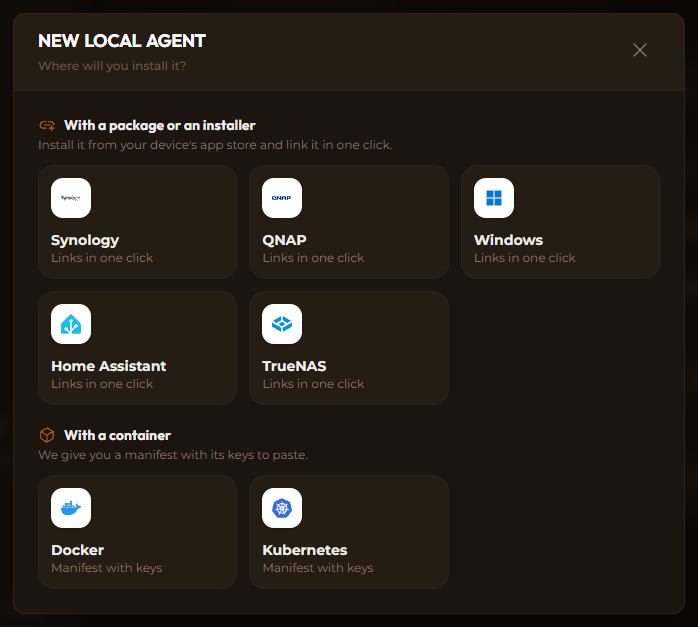
In BolloPrint, go to Settings → Printers, open the Local agent tab and click New agent. It asks where you'll install it: pick Docker, under With a container.
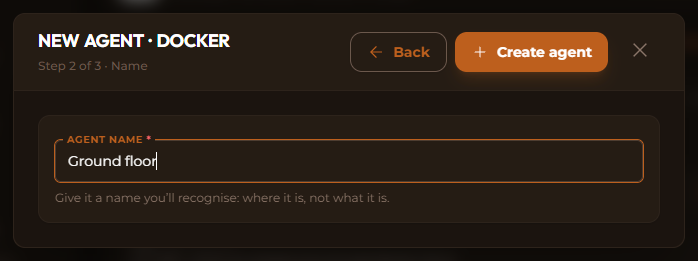
Give it a name that will still mean something in six months: where it is, not what it is. "Ground floor" or "Unit 2" work; "Agent 1" doesn't. Then click Create agent.
2. Copy the manifest
BolloPrint now shows you the manifest: a short docker-compose.yml with your
agent's code, its identity and the right version already written in. Leave
the Docker Compose tab selected, click Copy and keep it somewhere safe.
Then click Save.
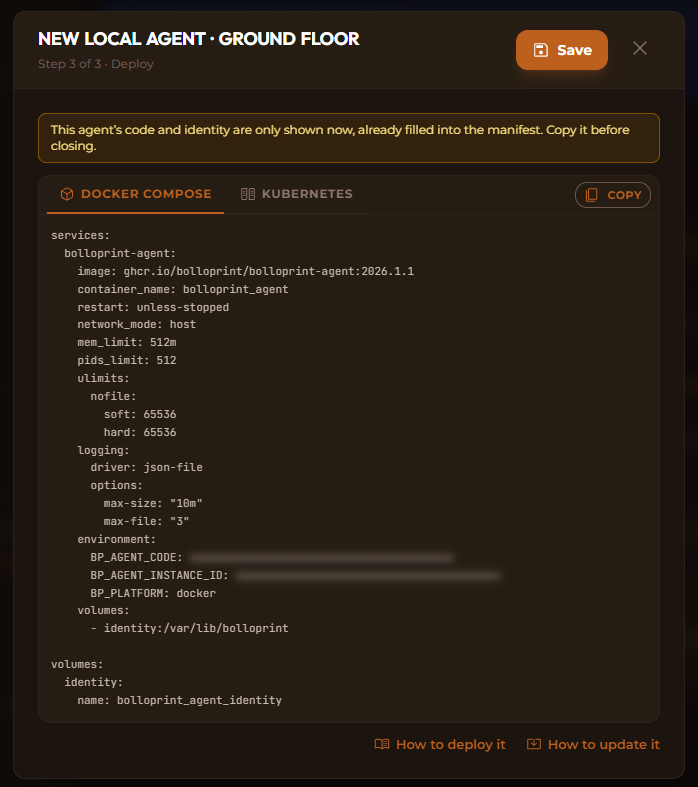
🔐 Copy it now: the keys are only shown once
We don't store them, so we can't show them to you again. If you lose the manifest, no harm done: open the agent with Edit (in its ⋮ menu), go to Deployment and click Regenerate keys. If it has never connected, nothing gets cut off.
Two lines are worth understanding, even though you won't touch them:
BP_AGENT_CODEandBP_AGENT_INSTANCE_IDare the agent's keys: which workshop it works for, and who it is. Treat them like a password.network_mode: hostis what lets the agent see your network to find the printers. It doesn't open any port.
3. Start it on your computer
Paste the manifest as it is. Pick whichever way you use Docker:
Docker Compose. Create a folder, for example bolloprint-agent, save the
manifest inside it as docker-compose.yml, and from that folder run:
docker compose up -d
Portainer. Go to Stacks → Add stack, name it bolloprint-agent, paste
the manifest into the Web editor and click Deploy the stack.
Your NAS's container manager. If your NAS has its own (Synology's
Container Manager, for example), create a new project and paste the
manifest as its docker-compose.yml. It's Docker Compose with a screen.
4. Check that it's online
Back in BolloPrint, the agent's row says Not installed until it connects for the first time. That isn't an error: it just hasn't been started yet. Its Install button gives you the short version of these steps if you need them.
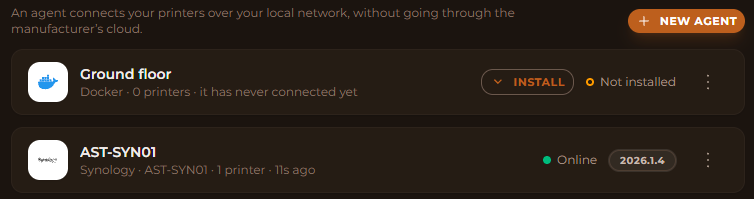
In less than a minute after you start the container, it switches to Online, with the name of the computer it runs on and its version. It won't ask you to authorise anything: that installation comes pre-approved.

If it doesn't come online, read what the agent says on that computer:
docker logs bolloprint_agent --tail 50
It's almost always one of three things: the manifest was only half pasted, the computer has no internet, or a firewall blocks outgoing traffic.
From here, your printers show up on their own under Printers on the local network, ready to Add. The rest of the journey, brand by brand, is in connect your printers over your own network.
Keeping it up to date
Since version 2026.1.1 the agent updates itself: it downloads the new version, checks that it's really ours and restarts with it. It never does that while one of its printers is printing. You don't touch your file.
Only if BolloPrint asks you to update by hand (an agent installed a long time ago,
from before automatic updates) do you have to do something, and it's small:
change only the version at the end of the image: line and redeploy.
image: ghcr.io/bolloprint/bolloprint-agent:2026.1.1
The version to use is the one on the image: line in the agent's Deployment
tab (⋮ → Edit). Then, from the folder of your docker-compose.yml:
docker compose pull
docker compose up -d
In Portainer, open the stack, edit the version, turn on Re-pull image and redeploy and click Update the stack.
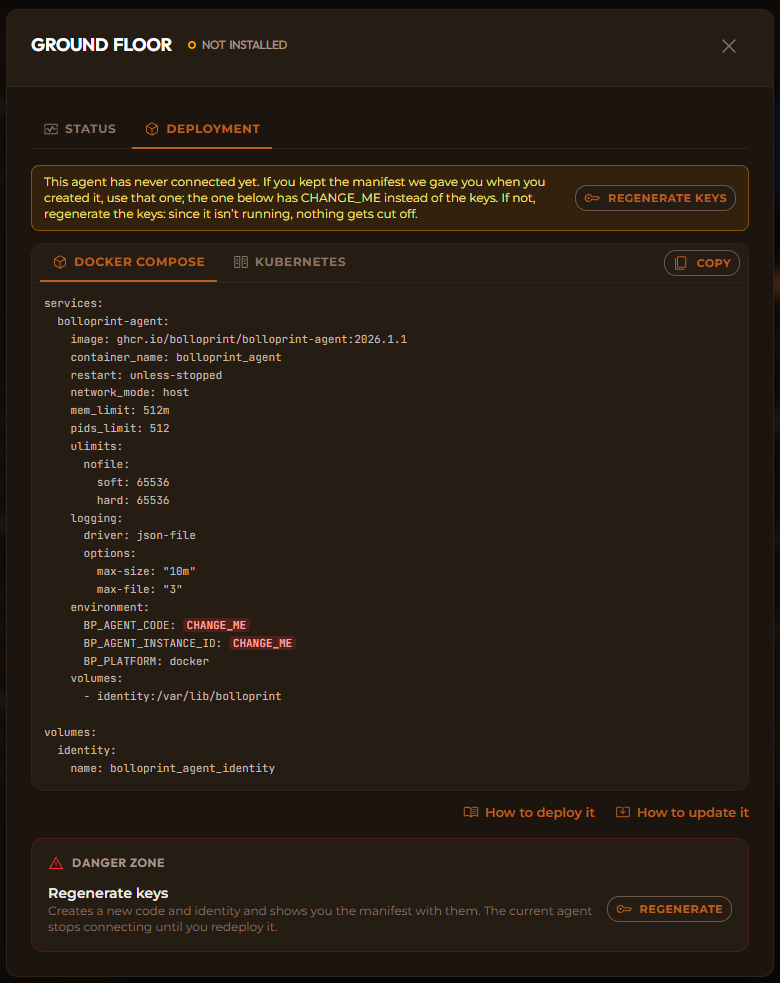
⚠️ Don't paste the Deployment tab's manifest over your file
For an agent that already exists, BolloPrint shows CHANGE_ME where the keys go, because it doesn't keep them. Paste that over your file and the agent loses its keys. Change only the version.
Moving it to another computer
The agent's identity lives inside the manifest, so the same file started on another machine is the same agent, with all its printers and no authorisation to give.
- Stop it on the old computer:
docker compose downin its folder, or delete the stack in Portainer. - Copy the
docker-compose.ymlto the new one and start it there withdocker compose up -d.
Stop the old one first: two computers using the same keys at the same time keep knocking each other off the connection.
When to regenerate the keys
Regenerate keys (in the agent's Deployment tab) creates a new code and identity and shows you a new manifest. Use it only if you lost the manifest or you think someone else has your keys. It cuts the running agent off at once, until you deploy the new manifest in place of the old one.
You never need it to update the agent.
Frequently asked questions
Do I need one agent per printer?
No. One agent handles the whole fleet. Have several only if you have separate networks or separate premises, one per site.
Can I run the same manifest on two computers?
No. For two computers, create two agents in BolloPrint, each with its own manifest.
What happens if I switch the computer off?
Nothing. When it comes back, the agent reconnects by itself. And if your internet goes down, the agent keeps reading the printers and sends everything when the line is back.
How do I remove it?
Delete it in BolloPrint (⋮ → Delete on its row), then stop and remove the
container on your computer (docker compose down). Its printers keep their
number and history if you add them again later.
💡 Need help?
Write to us from the contact page or on
our Discord. The last lines of
docker logs bolloprint_agent are the first thing we'll ask you for.
Related documentation
- Agent on Docker: every step and every detail
- The local agent: which installation suits you
- Printers on the local network: adding your printers
- Compatible printers: look up your model