If you have a Synology in the workshop, you already have the right place for the BolloPrint agent. It's on day and night, it sits on the same network as your printers, and it already runs the rest of your small services.
The agent comes as a native DSM package: you install it like any other Synology app and it shows up in the DSM main menu. No Docker, no Container Manager, no text to paste, and no code to copy. Set aside ten minutes.
This article is only about installing the agent on a Synology. What the agent is, which brands it supports and how to add each printer is in the local network tutorial. Come back to it when you're done here.
The Synology package is in beta
It works, but a step or two may still change. If something on your screen doesn't match what you read here, tell us.
Why on the NAS and not on your laptop
Because the agent is only useful while it's awake. If it runs on the computer you switch off when you leave, those hours are lost: what printed, how long it took, whether a print stopped at three in the morning. The NAS is on anyway.
It also gets the rest for free: it's on the printers' network, which is what lets the agent find them on its own, and it's light: the NAS keeps doing everything else as before.
💡 No, you won't touch the router
The agent calls out to BolloPrint, like a browser opening a web page. It never accepts connections from the internet: no open ports, no fixed IP, no firewall rules. It works the same behind a home router or a fibre line with CGNAT.
What you need first
Check these now rather than halfway through:
- DSM 7 or later. You'll find it in Control Panel → Info Center. DSM 6 won't do.
- Your NAS's processor. Same place, Info Center. Intel or AMD means 64-bit; for ARM, your model's spec sheet on Synology's website says whether it's 64 or 32-bit. You'll need it to pick the right download.
- A DSM administrator account. Only administrators can install packages and open the agent's page.
- To be the owner of your workshop in BolloPrint. When you link the agent, you only see the workshops you own.
- The NAS and the printers on the same network. On separate networks (VLANs) the agent still works, but you'll add each printer by its IP.
1. Download the package
In BolloPrint, go to Settings → Printers → Local agent → New agent and pick Synology.
There's one download button per processor type: Intel or AMD (64-bit),
ARM (64-bit) and ARM (32-bit). Click yours. You get a file ending in
.spk, which is a DSM package. If you're not sure which one, the link just
below the buttons takes you to Synology's website to check your model.
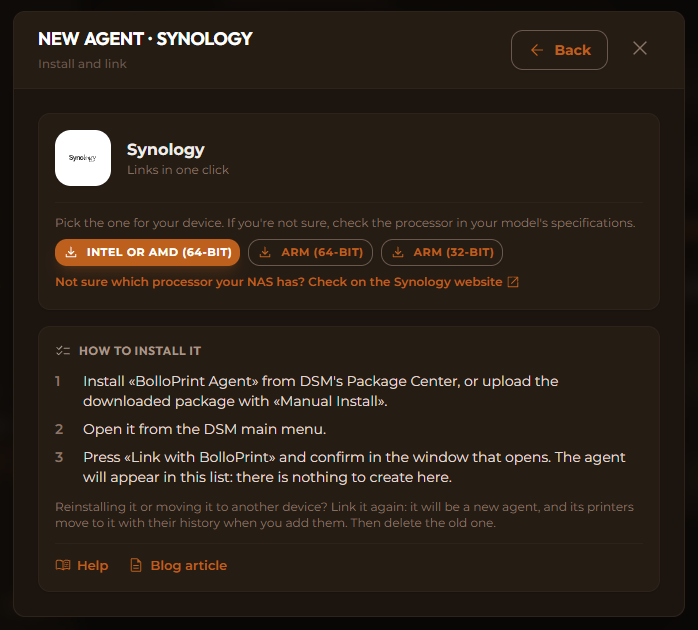
Notice what's not on that screen: no code, no key, nothing to create. The agent is born when you link it, in step 3.
2. Install it from Package Center
Open DSM in your browser and go to Package Center. Top right, click
Manual Install, then Browse, pick the .spk you just downloaded and
click Next.
DSM warns you that the package isn't published by Synology. Accept it to carry on.
The wizard then shows a single setting: the port of the agent's page, with 8257 already filled in. Leave it as it is unless DSM tells you it's taken; in that case, type 8364. Click Next and, on the summary, Done.
<!-- SCREENSHOT: 03-install-wizard.png — DSM 7 (English UI) BolloPrint Agent install wizard: the page-port field with 8257 and the text «After installing, open BolloPrint Agent from the DSM main menu and press “Link with BolloPrint”…». -->A minute later the package shows as Running, and BolloPrint Agent appears in the DSM main menu.
💡 «This package is not compatible with your model»
That means you downloaded the package for a different processor. Go back to BolloPrint and download the other one.
3. Link it to your workshop
This is the step that replaces the old "copy this code and paste it there".
Open the DSM main menu (the icon at the top left) and click BolloPrint Agent. It opens in a new tab with the agent's own page: it says the agent doesn't belong to any workshop yet and shows a short code.
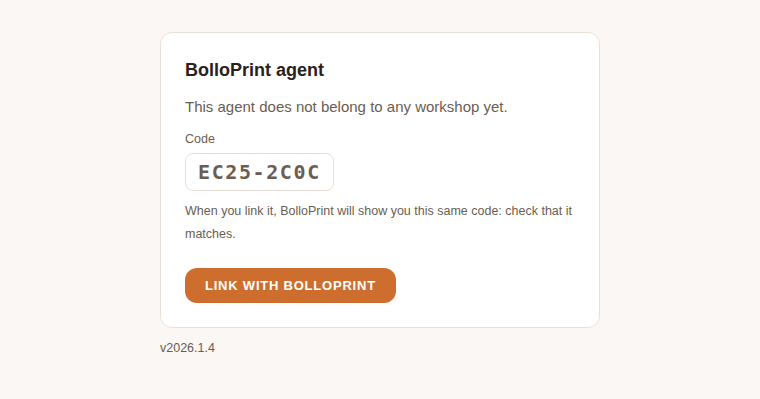
Click Link with BolloPrint. BolloPrint opens (sign in if you need to) and asks which workshop the agent goes to. Then it shows you the device — your NAS's name and «Synology» — and the code. Check that it's the same code the agent's page showed, and click Add to workshop.
<!-- SCREENSHOT: 05-confirm.png — BolloPrint (English UI) «Add an agent to <workshop>» confirmation: Device «<NAS name> · Synology», the same code as 04-agent-page, and the «Add to workshop» button. -->You're taken back to the agent's page, which now says Linked to your workshop.
🔐 Only confirm what you just clicked yourself
If you ever get a link to "add an agent" that you didn't ask for, close it. An agent is only linked from its own page, and on a Synology that page only opens for an administrator of your NAS.
4. Check that it works
In BolloPrint, Settings → Printers → Local agent: the agent is there with your NAS's name and the Synology logo, Online. That's the one that counts: the whole circuit works.
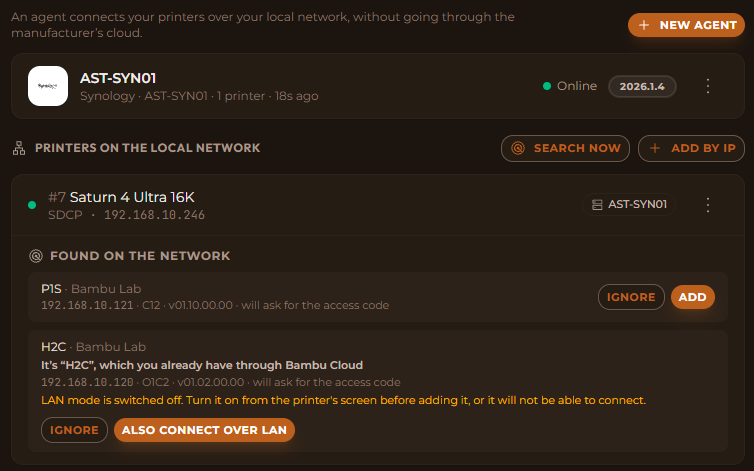
Within a minute or so it starts finding printers on your network. They appear under Printers on the local network, and you add them from there; the ones that don't show up on their own, with Add by IP. Brand by brand, it's all in the local network tutorial.
Updating it
You almost never have to do anything: the agent updates itself. When a new version comes out, it downloads it, checks that it's ours and restarts with it.
Only if BolloPrint tells you the agent needs a manual update do you do it yourself, and it's installing the new package over the one you have: download it again from the same place in BolloPrint (Local agent → New agent → Synology), then Package Center → Manual Install with the new file. DSM sees it's already installed and upgrades it, without asking for the port again. The agent stays linked to the same workshop, with the same printers and all their history. There's nothing to link again.
Once the package is listed in Synology's Package Center catalogue, Package Center will tell you itself, and updating will be one click.
Don't uninstall to update
Uninstalling erases the agent's identity: what you install afterwards is a new agent you have to link again. To update, always install on top.
Moving it, or starting over
You can't "transfer" an agent, but you don't need to: what moves are the printers, and they move with their whole history.
- Install the package on the new NAS and link it. It shows up as a second agent.
- Open each printer with Edit in its ⋮ menu and switch it to the new agent.
- When the old agent has no printers left, Delete it from the ⋮ menu of its row.
To remove the agent for good: in DSM, Package Center → BolloPrint Agent → Action → Uninstall, then Delete the agent from its ⋮ menu in BolloPrint. Done the other way round, it works too: once you delete it in BolloPrint, the agent notices, forgets its link and its page offers Link with BolloPrint again. Nothing is lost either way: if you add one of its printers again later, it comes back with its number and its history.
If something goes wrong
| What you see | What it usually is |
|---|---|
| The wizard says port 8257 is in use | Another app on the NAS uses it. Type 8364 and carry on. |
| «Not compatible with your model» | The package for another processor. Download the right one. |
| Opening BolloPrint Agent asks you to sign in to DSM | Open it from the DSM main menu, signed in as an administrator. |
| The page says the agent isn't responding | The package is stopped or still starting. In Package Center, Action → Run, and give it a few seconds. |
| Your workshop isn't in the list when linking | You only see workshops you own. Ask the owner to link it. |
| «This link request is not valid», or it has expired | Go back to the agent's page and click Link with BolloPrint again. |
| It takes a while to come back after a NAS restart | Give it a few minutes: it starts with DSM and keeps retrying until the NAS has internet. |
| It finds no printers | Same network? If not, add them by IP. If you've just switched one on, click Search now. If the DSM firewall is on, allow BolloPrint Agent's ports (it's in the list of applications when you create a rule). |
Prefer Docker?
If your NAS already runs Container Manager and you'd rather keep everything in containers, the agent also runs as a container. The steps are in Agent on Docker. For most workshops, the package is simpler: it's a DSM app like any other, and it's linked in one click.
Enjoy having your printers in view, with your Synology as the bridge.
Further reading
- Agent on Synology — the full guide: install, update, move, uninstall and troubleshooting
- The local agent — what it does, several agents, diagnostics
- Local network printers — adding your machines
- Compatible printers — look up your model