If there's a TrueNAS in your workshop, you already have the perfect home for the BolloPrint agent. It's on twenty-four hours a day, it sits on the same network as your printers, and it has been running apps for years.
You won't type a single command. Everything happens in the TrueNAS web interface: you copy a short text from BolloPrint, paste it into a box, and press a button to link the agent to your workshop. Count on ten minutes, half of them waiting for the download.
This post is only about installing on TrueNAS. What the agent is, which brands it supports and how you add each printer is in the local network tutorial. The reference page, with troubleshooting, is Agent on TrueNAS in the user guide.
Beta
The TrueNAS agent is in beta: it works, but a step or two may still change. If something on your screen doesn't match, tell us.
What you need
- TrueNAS 24.10 or later (Community Edition). Older versions don't have Install via YAML. You'll find yours under Dashboard → System Information.
- Apps turned on. The first time you open Apps, TrueNAS asks which pool to keep them on. If it already says Apps Service Running, you're set.
- To be the owner of your workshop in BolloPrint. Only owners can add an agent.
- The TrueNAS on the same network as your printers, and able to reach the internet. That's all: no open ports, no fixed IP.
💡 No, you won't have to touch the router
The agent dials out to BolloPrint, exactly like a browser opening a web page. It never accepts connections from the internet.
1. Copy the YAML from BolloPrint
In BolloPrint, go to Settings → Printers → Local agent → New agent and pick TrueNAS under With a package or an installer. You'll see four short steps and, below them, a box with the YAML: the text that tells TrueNAS what to install. Click Copy.
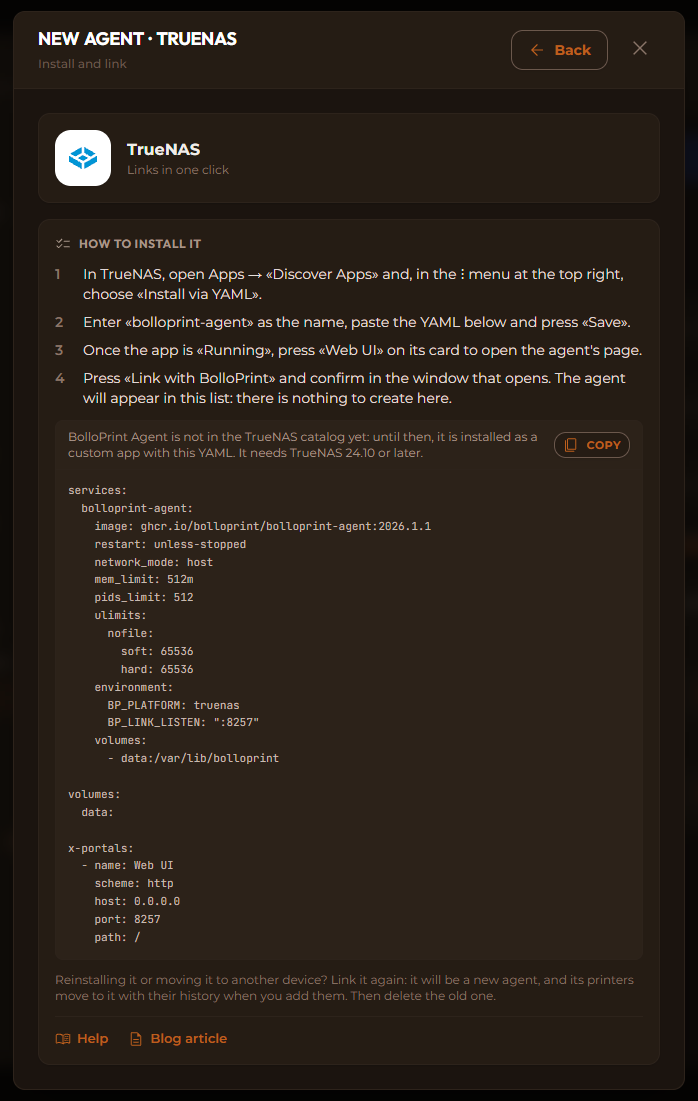
There's nothing to create and no key to keep safe: the YAML is the same for every workshop. The agent is born when you link it, in step 3.
Why YAML and not the app catalog?
The BolloPrint agent isn't in the TrueNAS app catalog yet. Until it is, TrueNAS installs it as a custom app from this YAML. Once it's in the catalog, you'll find it in Discover Apps like any other app.
2. Install it in TrueNAS
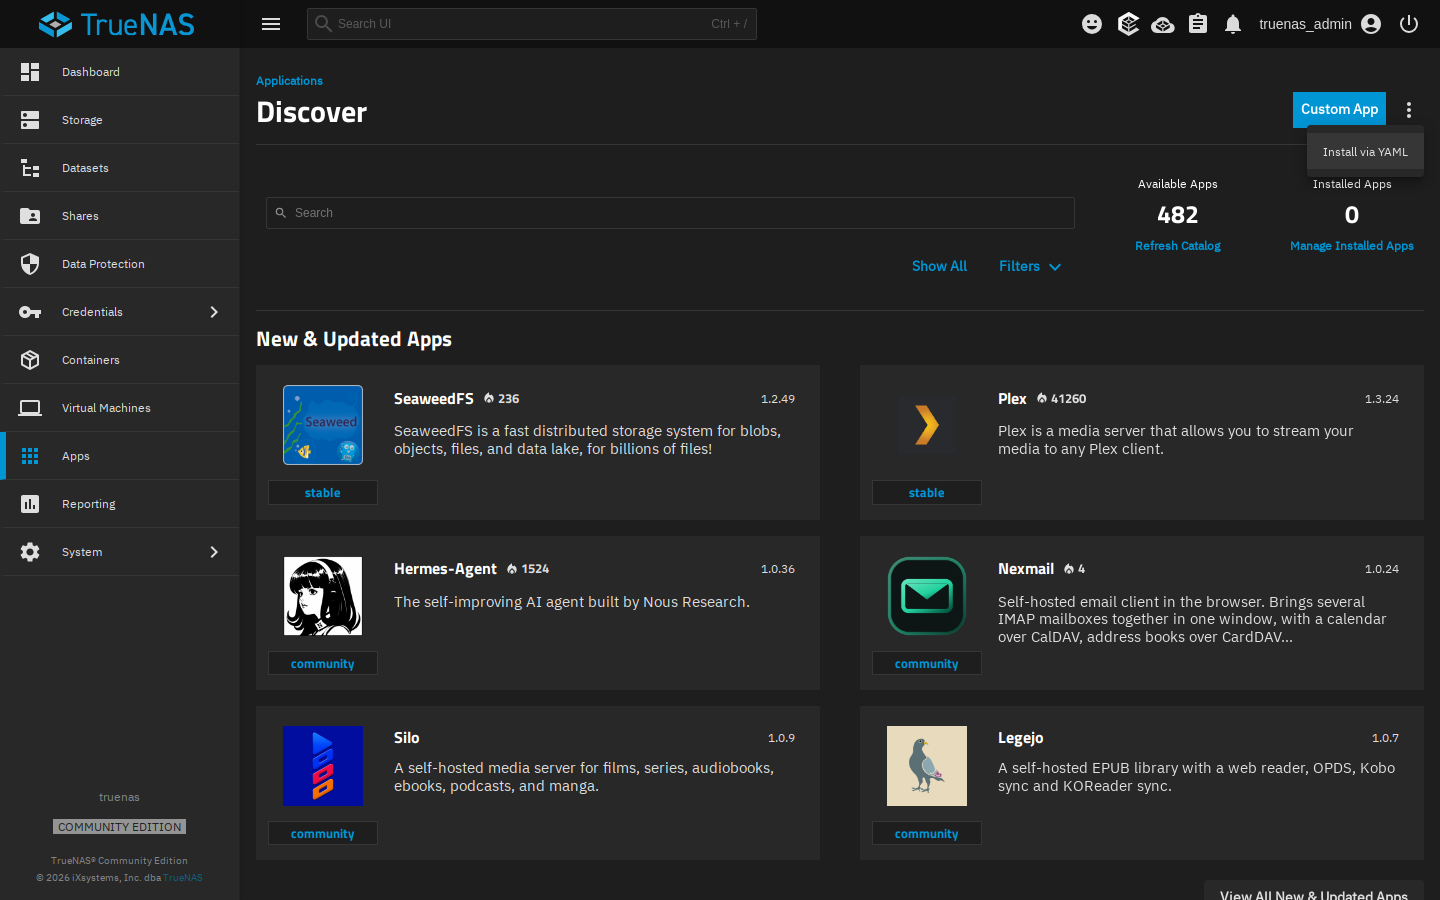
- In TrueNAS, open Apps and click Discover Apps.
- At the top right, next to Custom App, open the ⋮ menu and choose Install via YAML.
- Under Name, type
bolloprint-agent. - Under Custom Config, paste the YAML you copied.
- Click Save.
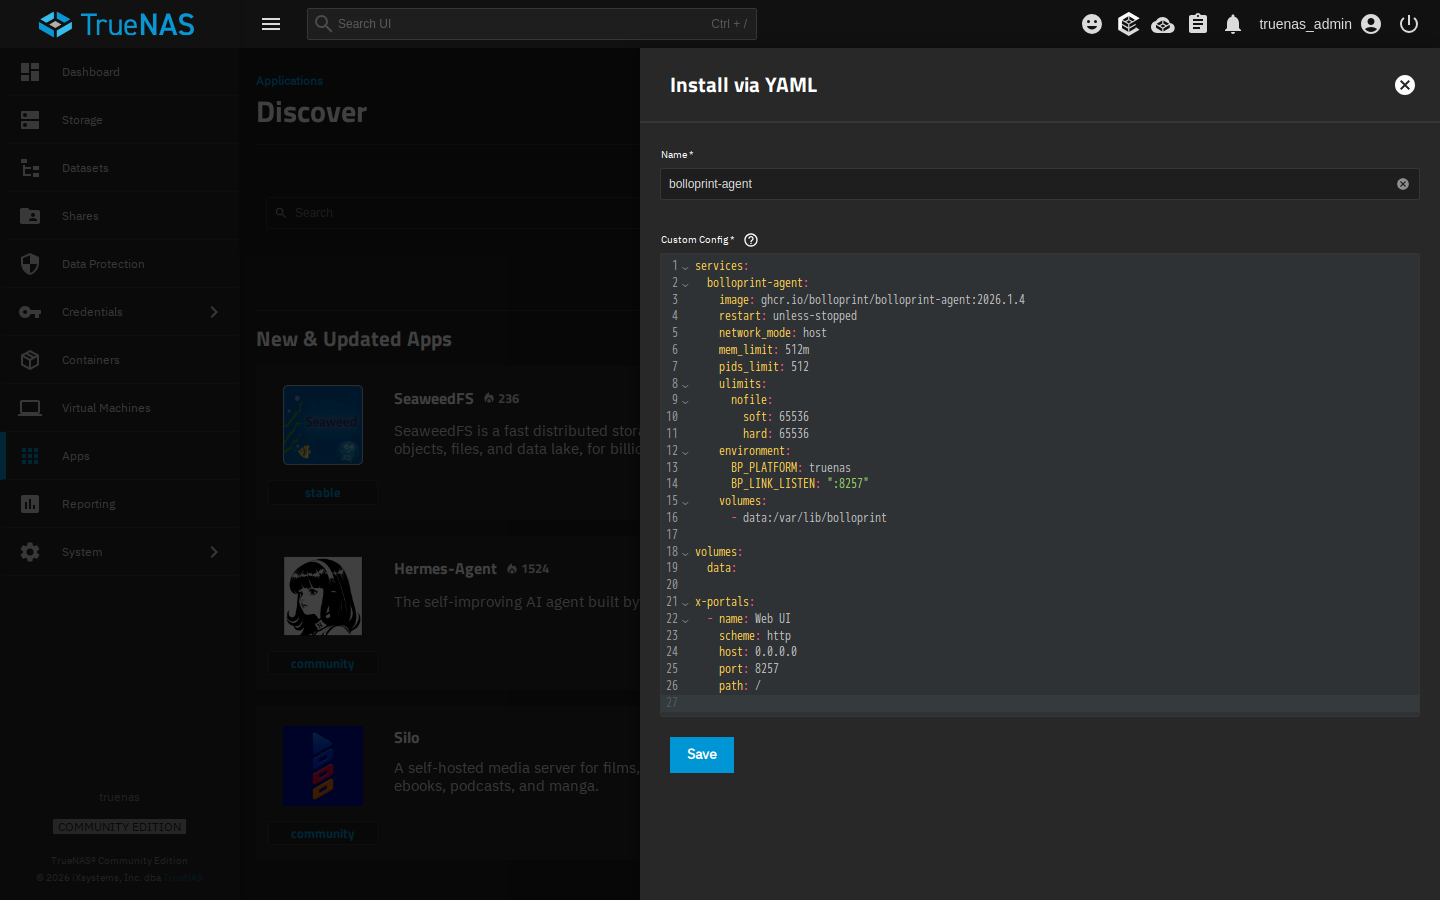
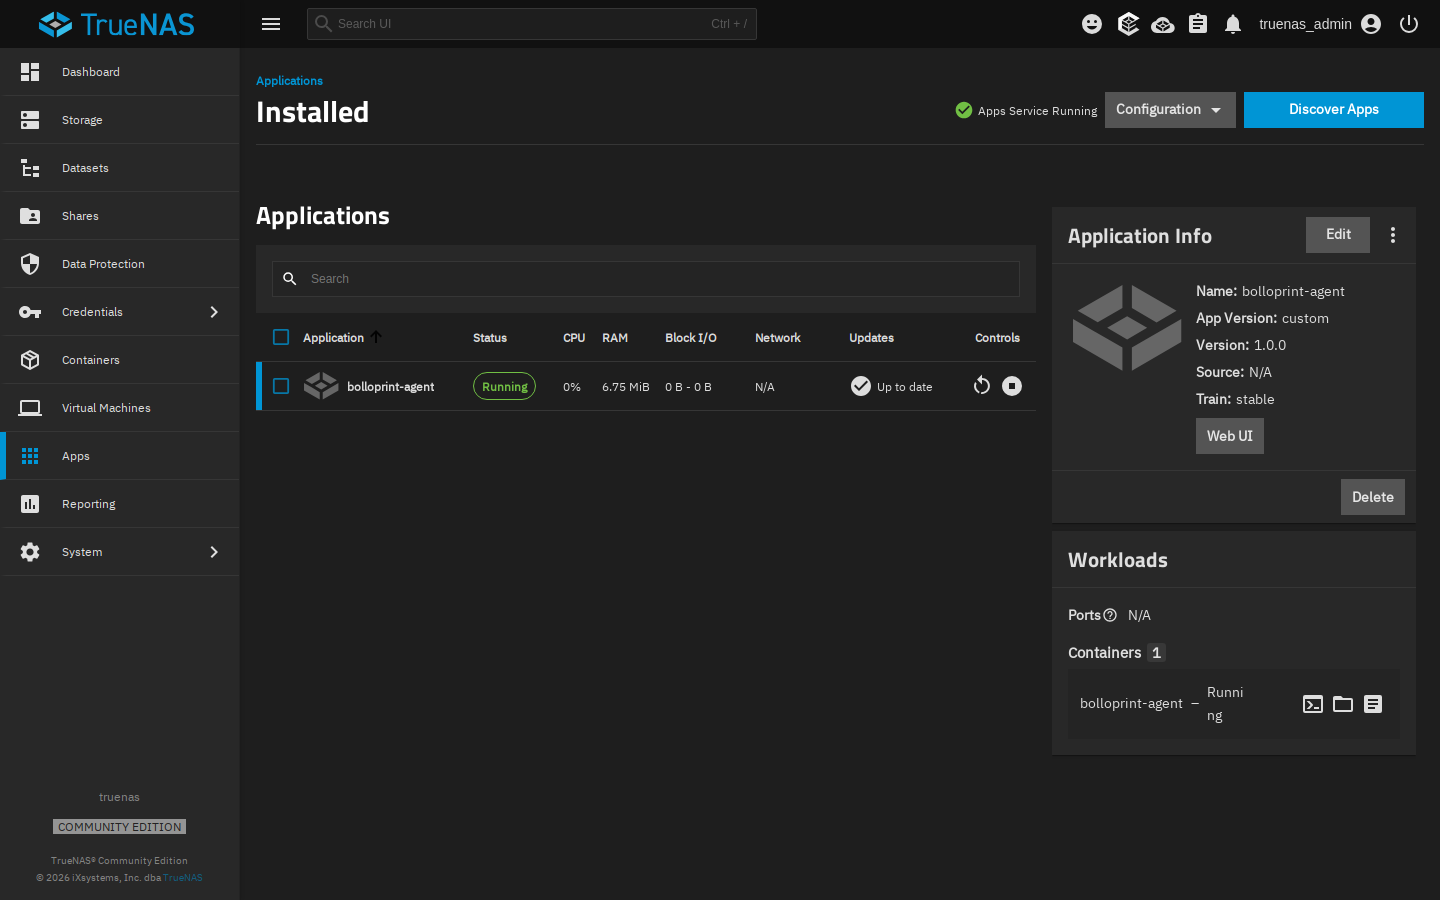
TrueNAS downloads the agent and starts it. A minute later it shows up under Apps → Installed as Running.
3. Link it to your workshop
- In Apps → Installed, click bolloprint-agent and, under Application Info, press Web UI. The agent's own page opens in a new tab.
- The page says the agent doesn't belong to any workshop yet and shows an eight-character code. Press Link with BolloPrint.
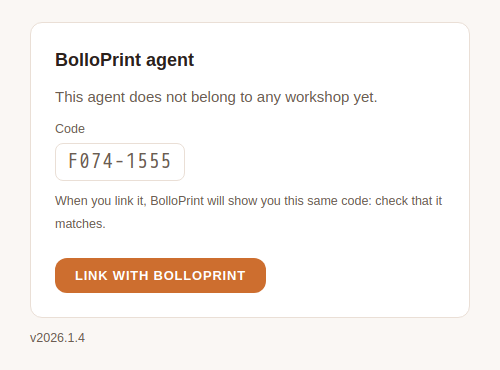
- BolloPrint opens. Sign in if you aren't already, and pick the workshop you're adding it to.
- BolloPrint shows the device (your TrueNAS) and the code. Check it's the same code the agent's page showed, give the agent a name and press Add to workshop.
That's it. Back in Settings → Printers → Local agent, the new agent shows the TrueNAS logo and Online, and its page now says it's linked to your workshop.
<!-- SCREENSHOT 07-bolloprint-agent-online.png: BolloPrint (English UI), Settings → Printers → Local agent — the TrueNAS agent in the list, Online, with its version. -->Only confirm what you just started
If you ever get a link to "add an agent" that you didn't ask for, close it. An agent can only be linked from its own page, on your network.
4. Give it your printers
The agent starts looking for printers on your network as soon as it's linked. Whatever it finds appears under Printers on the local network, below the list of agents, and you add them from there. Anything that doesn't show up on its own, you add with Add by IP.
How to do it for each brand is in the local network tutorial.
Keeping it up to date
You don't have to do anything: the agent updates itself. When a new version comes out, it downloads it, checks that it's really ours and restarts with it. It keeps that version in its own data folder, so it stays on it even after you restart the app or the TrueNAS.
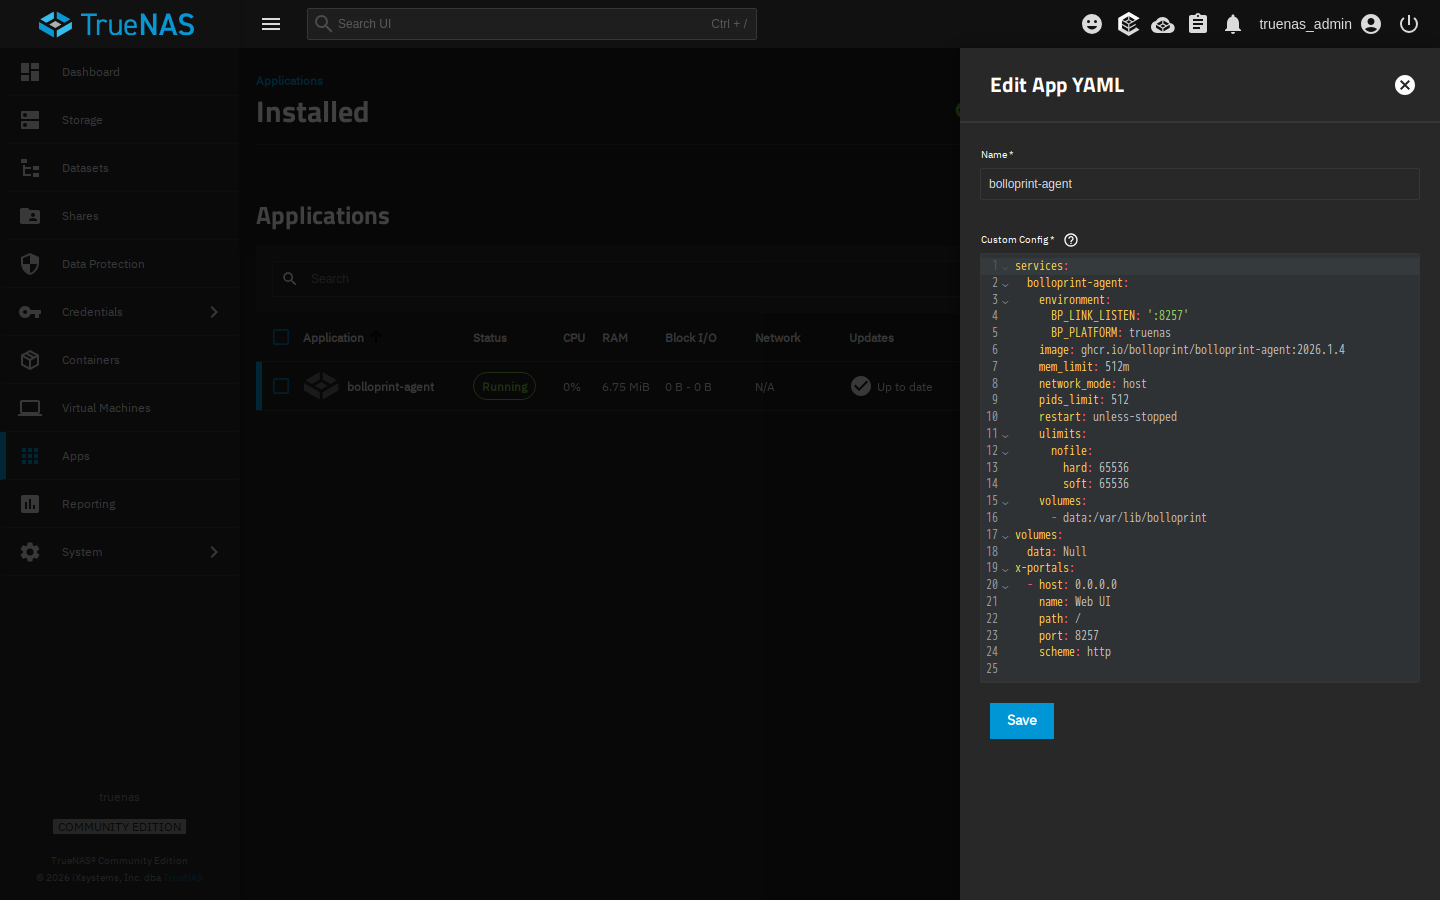
That's why TrueNAS keeps saying Up to date and the image: line in the YAML
doesn't change: that's the version it was installed with, not the one running.
BolloPrint shows you the one running, next to the agent.
Only if BolloPrint ever tells you an agent needs a manual update: open
Apps → Installed → bolloprint-agent → Edit, change only the version at
the end of the image: line to the one BolloPrint shows under New agent →
TrueNAS, and click Save. It stays linked, with the same printers and their
history.
Don't delete it to update it
Deleting the app also deletes its data folder. Install it again after that and it's a new agent that has to be linked. To update, always use Edit.
Moving it or removing it
- To another machine, or a fresh install: it's a new agent. Install and link it as above, add your printers to it (they move over with their history) and delete the old agent in BolloPrint.
- To remove it: delete the agent in BolloPrint first (Settings → Printers → Local agent, the agent's ⋮ menu → Delete). Within seconds its page goes back to offering Link with BolloPrint. Then delete the app in TrueNAS (Apps → Installed → bolloprint-agent → Delete).
If something doesn't behave as described here, the Agent on TrueNAS page in the user guide has a troubleshooting table: a busy port, an app that won't start, an agent that shows as offline.
Enjoy having your printers in view, with your TrueNAS as the bridge.
Related documentation
- Agent on TrueNAS: the full reference, with troubleshooting
- The local agent: what it is and which printers it connects
- Local network printers: adding each brand once the agent is online
- Agent on Docker: if you'd rather run it on any computer with Docker